The Linux Command stat is very useful when you need to check detailed information about a file or directory. In this article, we will explain how to use the stat command, its main options, and how to apply it in real-life scenarios.
Table of Contents
What is the Linux Command stat?
The stat command is a Linux command that shows the status of a file or file system. It provides various information such as file size, permissions, last access time, modification time, and creation time.
Basic Usage
To use the stat command, enter the following in the terminal:
stat [filename or directory]For example, to check the status of the file example.txt in the current directory, enter:
stat example.txtExecuting this command will output the following result.

Main Options
The stat command provides various options to selectively display the information you need. Let’s look at some main options.
-L Option (Dereference Link)
The -L option allows you to view the original file information if the file is a symbolic link. Instead of checking the link itself and then using the stat command to find the original, you can use the -L option to directly view the original file’s information.
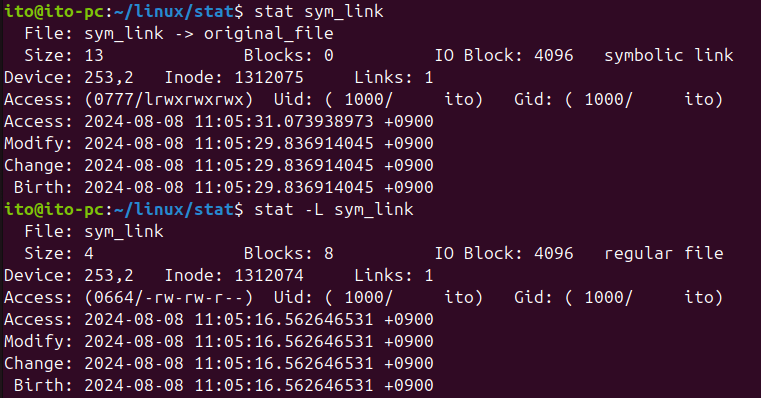
stat -L filenameIn the figure below, using the stat command without the -L option shows how the symbolic link is connected and indicates that the file is a symbolic link. On the other hand, using the -L option shows the contents of the original file original_file.
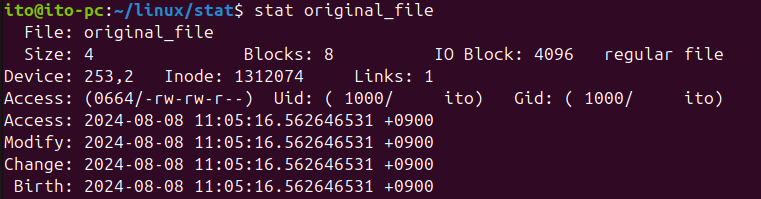
Below is the information for original_file. It confirms the same result when using the stat -L option as shown above.
-c, –format Option (Specify Format)
The -c and --format options allow you to specify the output format. However, special characters used with backslashes in the output format string are not interpreted. The output ends with a newline character (\n) added at the end.
Here is an example that sequentially shows the file name, size, and permissions.
stat -c "Name: %n Size(bytes): %s Permissions: %A" example.txtIn this command, %n represents the file name and %s represents the file size. The result shows the file name and file size as follows.

–printf Option
The --printf option can use the same format types as the -c or --format options. However, unlike the -c or --format options, it does not add a newline after printing the string format. Therefore, you need to add a newline character if you want a newline. Additionally, using the –printf option allows for the use of special characters like \n and \t with backslashes.
stat --printf="Name: %n\nSize: %s\nPermissions: %A" example.txtIn the example below, because the newline character was not added, the next command prompt appears immediately after the output string.

-t Option (Terse Format)
The -t option summarizes the output into a single line. This is useful for easily comparing multiple files.
stat -t example.txtThe result is as follows.

The above output is equivalent to using the -c option as shown below.
stat -c "%n %s %b %f %u %g %D %i %h %t %T %X %Y %Z %W %o" original_fileOutput Format Types
Below are the format sequences you can use for output.
The valid format sequences for files (without --file-system):
%apermission bits in octal (note '#' and '0' printf flags)
%Apermission bits and file type in human readable form
%bnumber of blocks allocated (see %B)
%Bthe size in bytes of each block reported by %b
%CSELinux security context string
%ddevice number in decimal (st_dev)
%Ddevice number in hex (st_dev)
%Hdmajor device number in decimal
%Ldminor device number in decimal
%fraw mode in hex
%Ffile type
%ggroup ID of owner
%Ggroup name of owner
%hnumber of hard links
%iinode number
%mmount point
%nfile name
%Nquoted file name with dereference if symbolic link
%ooptimal I/O transfer size hint
%stotal size, in bytes
%rdevice type in decimal (st_rdev)
%Rdevice type in hex (st_rdev)
%Hrmajor device type in decimal, for character/block device special files
%Lrminor device type in decimal, for character/block device special files
%tmajor device type in hex, for character/block device special files
%Tminor device type in hex, for character/block device special files
%uuser ID of owner
%Uuser name of owner
%wtime of file birth, human-readable; - if unknown
%Wtime of file birth, seconds since Epoch; 0 if unknown
%xtime of last access, human-readable
%Xtime of last access, seconds since Epoch
%ytime of last data modification, human-readable
%Ytime of last data modification, seconds since Epoch
%ztime of last status change, human-readable
%Ztime of last status change, seconds since Epoch
Valid format sequences for file systems:
%afree blocks available to non-superuser
%btotal data blocks in file system
%ctotal file nodes in file system
%dfree file nodes in file system
%ffree blocks in file system
%ifile system ID in hex
%lmaximum length of filenames
%nfile name
%sblock size (for faster transfers)
%Sfundamental block size (for block counts)
%tfile system type in hex
%Tfile system type in human readable form
Real-Life Applications
File Management and Backup
You can check the last access time and modification time of a file to determine how frequently it is used. This is useful for organizing old files or planning a backup strategy.
Writing Scripts
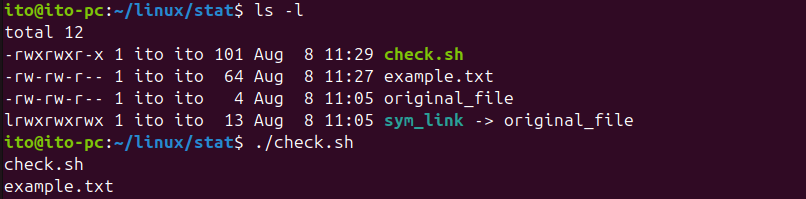
Using the stat command, you can write various scripts. For example, you can write a script that finds files above a certain size and lists them.
#!/bin/bash
for file in *
do
  if [ $(stat -c %s "$file") -gt 50 ]
  then
    echo "$file"
  fi
doneThis script lists files in the current directory that are larger than 50 bytes. Among the files below, only check.sh and example.txt, which are larger than 50 bytes, are listed.
Summary
The stat command is a very useful tool for checking detailed information about files or directories in a Linux system. By utilizing various options, you can efficiently obtain the necessary information, which can be applied to file management, script writing, system monitoring, and more. Effectively using the stat command can help you manage your Linux system more efficiently.