The Linux Command df is one of the most commonly used commands for monitoring and managing disk space during system operations. In this post, we will introduce the basic usage of the df command, various options, and practical ways to use it in real-life scenarios.
Table of Contents
Basic Usage of the Linux Command df
The df command stands for “Disk Free,” and it shows the current disk space usage of the file systems in use on the system. The most basic way to use the df command is simply to type df in the terminal. This will display the disk usage of all currently mounted file systems in a table format.
dfUnderstanding the Basic Output Format
When you enter the df command, the following information is displayed:
- Filesystem: The name of the file system. This refers to the device or partition where directories or files are stored.
- 1K-blocks: The total space available in the file system, shown in kilobytes (KB).
- Used: The amount of disk space that is currently in use.
- Available: The amount of disk space that is available (remaining).
- Use%: The percentage of disk space that is currently used.
- Mounted on: The directory where the file system is mounted. Mounting is the process of making an external disk or partition accessible at a specific directory.
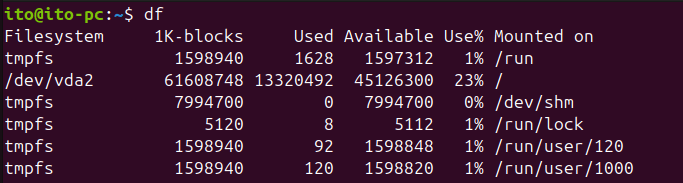
In the above figure, you can see that the /dev/vda2 file system is mounted on the / directory, with about 13GB, or 23%, of the total 61GB in use, leaving approximately 45GB available.
Useful Options for the df Command
The df command offers various options to provide more detailed information about disk space usage. Here, we’ll introduce some of the most commonly used options.
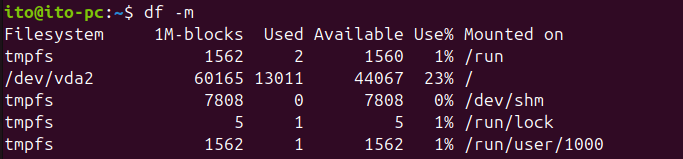
-m (Mega bytes blocks): Display in MB
By default, the df command shows disk space in 1KB blocks. If you want to view it in megabytes (MB), you can use the -m option.
df -mThe output example shows that the 1K-blocks have changed to 1M-blocks, and the capacity is displayed in megabytes.
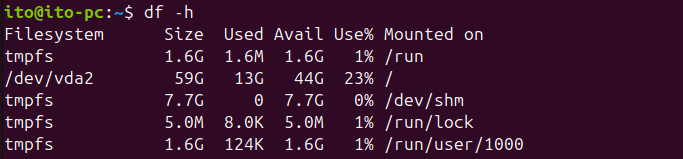
-h (Human-Readable): Easier to Read
This option displays disk space in a format that is easier for humans to read. It converts the size into kilobytes (KB), megabytes (MB), gigabytes (GB), etc.
df -hUsing this option, you can more intuitively check the disk capacity. The size, which was difficult to read in kilobytes, can now be easily understood using K, M, and G units.
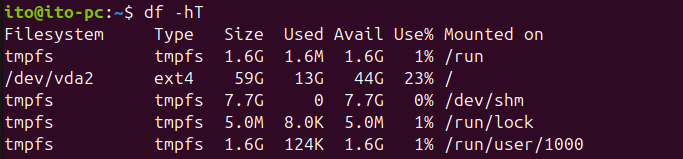
-T (File System Type): Display File System Type
This option displays the type of each file system. File system types, such as ext4, xfs, and nfs, determine how data is stored and managed on the disk.
df -TThe output example shows that a “Type” column has been added between “Filesystem” and “Size.” You can see that tmpfs and ext4 are used in the respective file systems.
-i (Inodes): Display Inodes Information
The -i option shows the usage of inodes instead of disk space. Inodes are structures that store metadata about files and directories in the file system. If inodes run out, no new files can be created, even if there is available disk space.
df -iThe output example shows the inodes usage with columns such as Inodes, IUsed, IFree, and IUse%, which indicate how many inodes are available and currently in use.

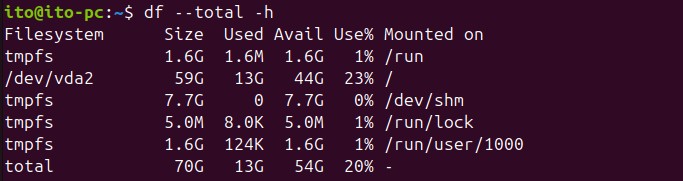
–total: Check Total Disk Usage
This option sums up the disk usage across multiple file systems. It is useful for getting an overall view of the system’s disk usage.
df --totalThe output example shows the total values on the bottom row, allowing you to check the total disk usage.
-x (exclude): Exclude Specific File System Types
You can exclude specific file system types from the disk usage report. For example, to exclude the tmpfs type, you can use the following command:
df -x tmpfsAs shown below, only /dev/vda2 is displayed, excluding the tmpfs file system.

Precautions When Using the df Command
- Root Privileges: Certain file systems or mounted external devices may be restricted from access by regular user privileges. In such cases, you need to run the df command with
sudo. - Network File Systems (NFS): Network file systems like NFS may experience delays in information retrieval depending on the network status. Keep this in mind when using the df command.
- Accurate Capacity Calculation: The df command may exclude reserved space in the file system from the reported capacity. To ensure accurate measurements, consider using other commands or tools in conjunction.
Summary
The Linux Command df is a powerful tool for quickly assessing disk space usage on a Linux system. In addition to its basic usage, leveraging various options can help you manage system administration and disk space issues more effectively. Options such as -h, -T, and -i are especially useful for everyday system monitoring.
We hope this post has helped you understand the various features and options of the df command, as well as how to use it in practical scenarios. The next time you need to manage disk space on Linux, be sure to take full advantage of the df command.