The Linux Command chown can be used when managing a Linux system and needing to change the ownership of files and directories. In this post, we will explain in detail from the basic usage of the Linux Command chown to various options and precautions.
Table of Contents
What is the Linux Command chown?
chown stands for “change owner” and is a command used to change the owner and group of a file or directory. In Linux, files and directories belong to specific users and groups, and access permissions are set according to the user and group. Therefore, properly setting ownership using the chown command is crucial for system security and management.
Basic Usage
The chown command is used with the format “options”, “owner”, followed by the file or directory. The group is an optional setting.
chown [options] [owner][:group] file/directoryChanging the Owner of a File
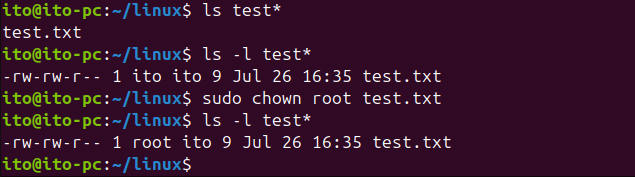
The following command changes the owner of the filename file to newuser.
chown newuser filenameThe following image shows the case where the owner of the test.txt file is changed to root. Since root privileges are required, the sudo command is used to perform the task with administrator rights.
Changing Both the Owner and Group of a File
The following command changes the owner of the filename file to newuser and the group to newgroup.
chown newuser:newgroup filenameIn the following example, the owner of the file is set to root and the group to www-data.

Main Options
The chown command has various options. Here are some of the commonly used ones.
-R (Recursive)
This option is used to change the ownership of a directory and all its files and subdirectories.
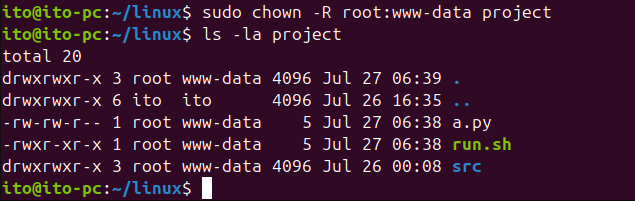
This command changes the owner of the directoryname directory and all its files and subdirectories to newuser and the group to newgroup.
chown -R newuser:newgroup directorynameIn the following example, the project directory and all its files and subdirectories are changed to root:www-data permissions.
–reference
This option is used to change the owner and group of a file to those of another reference file. The –reference option is also used in the chmod command.
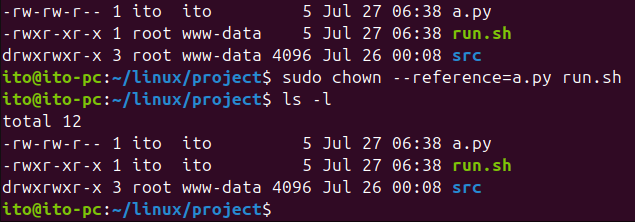
The following command changes the owner and group of targetfile to those of referencefile.
chown --reference=referencefile targetfileIn the following example, you can see that the owner and group ito:ito of a.py are applied to run.sh as well.
Useful Applications
Changing File Ownership After Changing User Accounts
When you delete and recreate a user account, you need to change the ownership of the existing files to the new user. The chown command is handy in such cases.
This command changes the owner of all files and directories in the /home/olduser directory to newuser and the group to newgroup.
find /home/olduser -exec chown newuser:newgroup {} \;Web Server Configuration
When setting up a web server, you often need to change the file owner to the web server owner (www-data).
This command changes the owner of the /var/www/html directory and all its files and subdirectories to www-data.
chown -R www-data:www-data /var/www/htmlPrecautions
Root Privileges
The chown command requires root privileges to change ownership. Therefore, it is common to use the sudo command when executing it.
sudo chown newuser filenameIf the sudo command is not used, you will encounter the “chown: changing ownership of ‘filename’: Operation not permitted” message, indicating that the current user does not have the necessary permissions to change ownership.

Verifying the Existence of the Owner and Group
Make sure that the owner and group you want to change to actually exist on the system. However, you don’t need to worry too much, as you will receive a “chown: invalid user: ‘username'” message if the user does not exist.

Proper Ownership Settings
If the owner or group is incorrectly changed, file access issues may occur. For example, in web services, if the web server is configured to use a specific user or group and the ownership of files or directories is incorrectly set, web page access may be blocked. Therefore, setting appropriate ownership of files and directories according to the situation is important.
Changing Important System Files
Improperly changing the ownership of important system files can cause the system to malfunction. Be especially careful with files like /etc/passwd or /etc/shadow.
Therefore, it is better to maintain the permissions of important system files. If modification is necessary, it is safer to edit using the sudo command. Changing ownership just because using the sudo command is inconvenient can compromise system security.
Summary
The chown command for changing the owner and group of files and directories in a Linux system is a crucial tool for system management. Understanding and utilizing the basic usage and main options can help you manage the system more efficiently. However, since changing ownership affects system permissions, always use it with caution.
We hope this post helps you understand the usage of the chown command and apply it effectively in your environment. If you have any further questions or need assistance, feel free to ask. Thank you.