The Linux command locate is incredibly useful when you need to quickly find a specific file or directory in a system with thousands of files. In this post, we will explore the locate command, as well as its updated versions, mlocate and plocate, and explain how to use these commands most efficiently.
Table of Contents
What Is the Linux Command locate?
The Linux command locate is a tool in Linux systems that allows you to quickly find the location of files or directories. It works by searching a database of files stored on the system, which enables it to return results extremely quickly. The database stores the full paths and names of files, allowing the locate command to perform searches based on this information.
Basic Usage of the Linux Command locate
Using the locate command is straightforward. For example, if you want to find a specific file, you can simply enter the command as follows, and it will display all paths that include the file name based on the system’s database:
locate filenameHow the locate Command Works
The locate command uses a database stored in the file /var/cache/locate/locatedb. In the case of plocate, the database is stored in /var/lib/plocate/plocate.db. This database file is updated by running the updatedb command, which scans the file structure of the system. You can set up a cron job to update the database at a specific time daily or update it manually.
The following command scans all files on the system to keep the database up to date:
sudo updatedbDifferences Between mlocate and plocate
There are variants of the locate command, namely mlocate and plocate. These two were developed to address some limitations of locate or to offer better performance in certain situations.
mlocate
mlocate stands for “Merging Locate” and is an upgraded version of locate. The key difference is in how it merges databases. When mlocate generates a new file system database, it does not discard the existing database but instead merges the new data into it. This improves performance and reduces system load. Additionally, mlocate takes file access permissions into account, so users cannot search for paths to files they don’t have permission to access, which provides a security advantage.
plocate
plocate is a more recent variant of locate, aimed at providing faster search performance than mlocate. plocate achieves this by compressing the database more efficiently, saving disk space and significantly speeding up searches. This makes plocate an excellent choice for large file systems.
On Ubuntu 24.04, you can install plocate using the following sudo apt install command:
sudo apt install plocateAfter installing plocate, you can see that the locate command is now linked to plocate. This means you are actually using plocate instead of the traditional locate.

locate: when plocate is installedChoosing and Using Each Command
It can be challenging to decide which of the three commands to use. Each has its pros and cons, so it’s best to choose the tool that suits your environment.
In the case of the Ubuntu 24.04 system I’m currently using, the mlocate package is not provided separately, and only locate and plocate are available for installation. Unless there’s a specific need to use the old version of locate, I recommend using plocate.
Major Options for the Linux Command locate
The locate command offers a variety of options that allow you to filter search results or adjust the output format.
-c Option: Count
The -c option returns the number of matching paths.
locate -c whereThis command counts 119 instances where “where” is part of the path. It includes instances where “where” appears not only in the file name but also in directory names along the path.

locate: using the -c option to count search results-i Option: Case-Insensitive Search
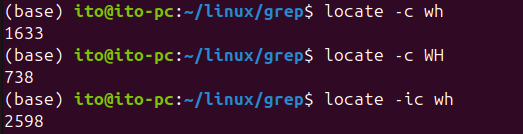
The -i option searches the database without considering case sensitivity.
locate -i whWhen searching for “wh” in lowercase, 1,633 results are found; for “WH” in uppercase, 738 results are found; and when ignoring case, 2,598 results are found. The higher count in the case-insensitive search indicates that variations like “wH” and “Wh” are also included.
locate: case-insensitive search results-r Option: Regex
Regular expressions (regex) are useful when you want to search for files that match a specific pattern. You can also use regular expressions to search within a specific directory. The following command searches for all files ending in .conf under the /etc/ directory:
locate -r '^/etc/.*conf$' By combining the pipeline with the grep command, you can further filter the results. Below, the command searches for all .conf files under the /etc/ directory and narrows the results to those that include “systemd.”

locate: filtering results using a pipeline with grep-n Option: Limit the Number of Results
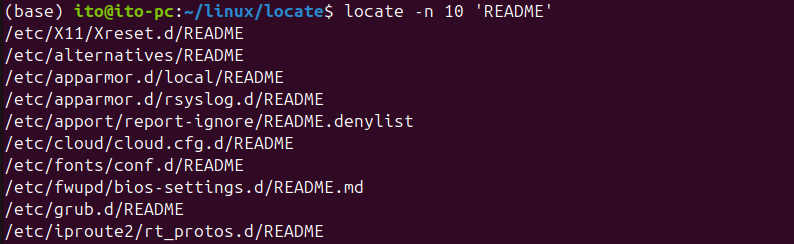
The -n option is useful when you need to limit the number of search results displayed. The following command outputs a maximum of 10 README files.
locate -n 10 'README'The figure below shows that only 10 results are displayed from the search.
--statistics Option
This option provides statistics about the locatedb database. It is supported in locate but not in plocate.
locate --statisticsAs shown in the figure below, you can see the path to the locatedb file and that it uses the GNU LOCATE02 format. Additionally, you can see the last modified date, the size of the Locate database, the total number of file names, and a compression rate of 83.19%.
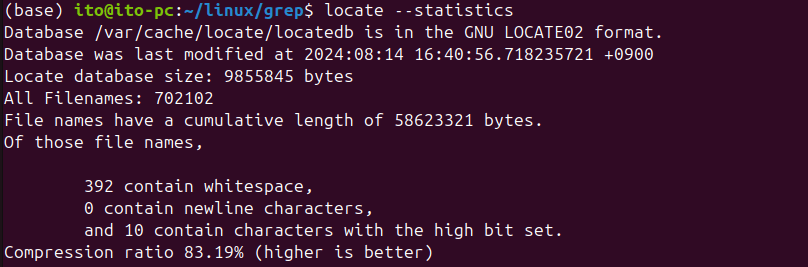
locate: using the --statistics optionIf plocate is installed, you’ll receive a message saying “locate: unrecognized option ‘–statistics'” as shown below.

plocate: --statistics option not supportedImportant Notes
There are a few things to keep in mind when using the locate command.
Database Updates
The database is not updated in real time. If you’ve recently created or moved a file, you’ll need to manually update the database using the updatedb command.
Efficiency
Frequent database updates can consume a lot of system resources. To maintain a smooth system experience, you should schedule updates during periods of low system usage using a cron job. You need to use the sudo command to set up the cron job correctly so that updatedb runs properly.
sudo crontab -eThe following configuration runs updatedb at exactly 5:00 AM every day.
0 5 * * * updatedbSummary
Efficiently finding files on a Linux system is a crucial task. The Linux commands locate, mlocate, and plocate each have their own strengths and should be chosen according to the situation. mlocate is an improvement over locate, and plocate further enhances performance, especially on large file systems. Additionally, various options of the locate command allow for more precise searches. For database updates and security, using mlocate or plocate instead of locate is often more beneficial. By utilizing these tools appropriately, you can perform file searches on Linux systems faster and more efficiently.